# NVA Quick Start

**Advisory** &#x20;

* Review the full User Manual or watch the tutorial video before operating.
* Use the cutting head’s red guide light only during alignment—do not apply cutting power.
* Follow your site’s laser-safety procedures and all local regulations.

### Overview of the NVA

<figure><img src="https://2847674722-files.gitbook.io/~/files/v0/b/gitbook-x-prod.appspot.com/o/spaces%2FYapTWIOXzXtyiG0euC2d%2Fuploads%2Fxd5yMrhVH4667sMlrv6e%2Fscreenshot-20250904-134837.png?alt=media&#x26;token=65f8e477-6f51-4742-b036-cdbc5ec8a1b9" alt=""><figcaption></figcaption></figure>

## 1. Unbox NVA & Power Testing

* Open the box and take out the NVA.
* Open the battery compartment on the underside of the NVA.
* Insert two 14500 Li-ion batteries (3.7 V each), observing (+/–) polarity.
* Close the compartment.

<figure><img src="https://2847674722-files.gitbook.io/~/files/v0/b/gitbook-x-prod.appspot.com/o/spaces%2FYapTWIOXzXtyiG0euC2d%2Fuploads%2F8LQlJ87ksv3oFQRQxdaL%2FPicture1.png?alt=media&#x26;token=c8ef801e-16cf-40f4-a486-943821119cd6" alt=""><figcaption></figcaption></figure>

* Press the power button to turn on the NVA; confirm the status LED lights on.

{% hint style="danger" %} <mark style="color:$warning;">\[Do NOT use AA alkaline/NiMH cells.]</mark>
{% endhint %}

{% hint style="info" %}

### No 14500 batteries?

Connect the included USB-C cable from the NVA to a power bank or power adaptor (5V/3A), then press the power.&#x20;

<img src="https://2847674722-files.gitbook.io/~/files/v0/b/gitbook-x-prod.appspot.com/o/spaces%2FYapTWIOXzXtyiG0euC2d%2Fuploads%2Fx2SHO9qU7verpzgzqdNo%2Fscreenshot-20250904-110131.png?alt=media&#x26;token=e347cafe-f74a-4fba-bdc1-006f0e77ac77" alt="" data-size="original">
{% endhint %}

## 2. Before you start

{% stepper %}
{% step %}

### 2.1 NVA Pre-alignment Preparation

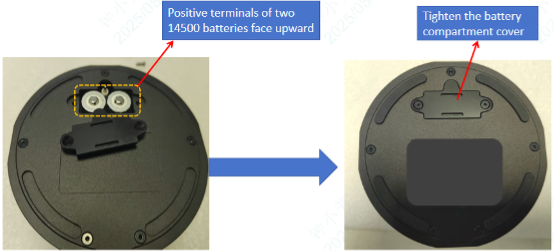
* Power on the NVA and confirm the status LED is steady.
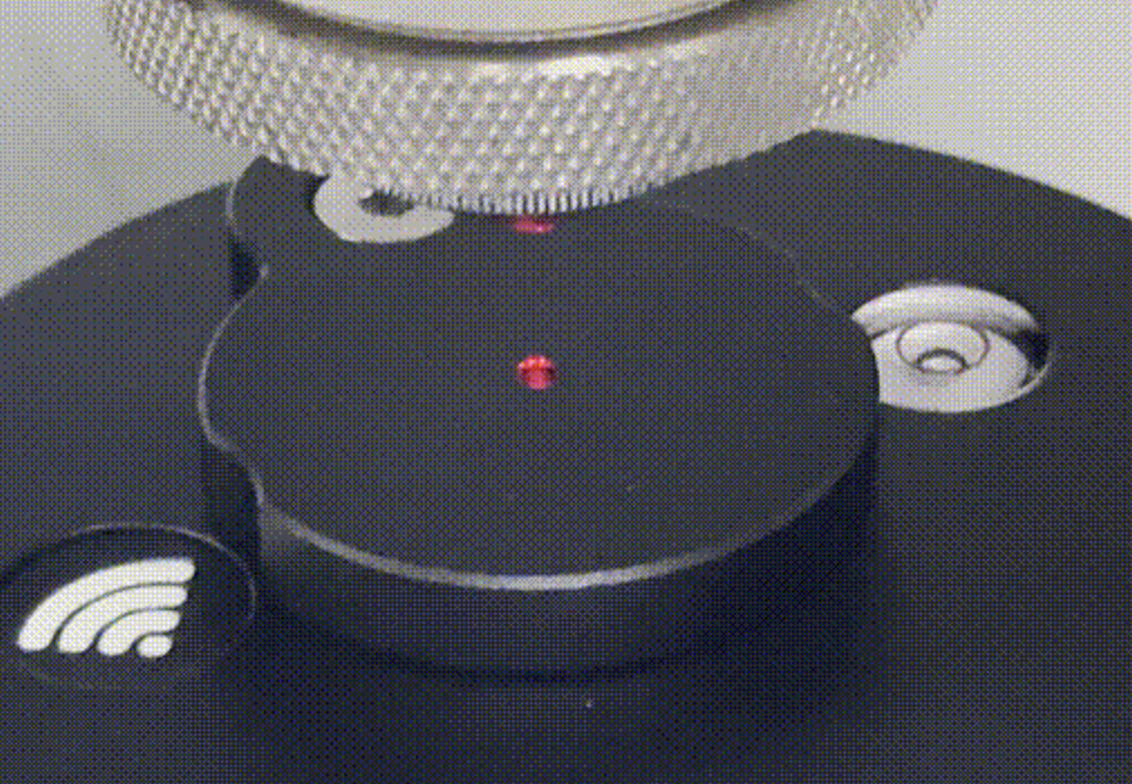
* Place the NVA horizontally directly under the laser cutting head; placing it on a metal sheet is recommended.
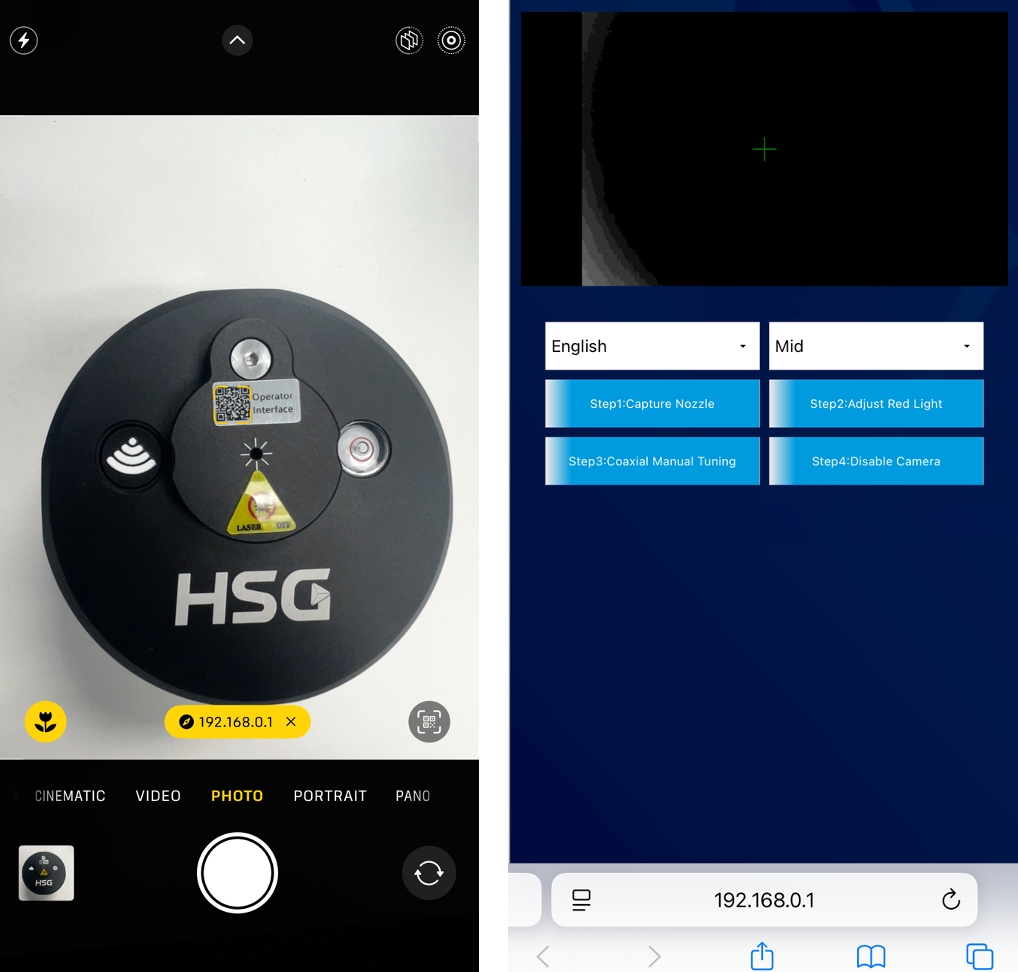
* Check the built-in bubble level is centered. If the unit isn’t level, shim the appropriate corner(s) (e.g., with paper) until level to avoid affecting alignment accuracy.

<figure><img src="https://2847674722-files.gitbook.io/~/files/v0/b/gitbook-x-prod.appspot.com/o/spaces%2FYapTWIOXzXtyiG0euC2d%2Fuploads%2FLr8TkscT6z2EV9l3EemM%2Fscreenshot-20250904-135932.png?alt=media&#x26;token=96e96136-cf2f-44cf-9e78-daefddc2508b" alt=""><figcaption></figcaption></figure>

{% endstep %}

{% step %}

### 2.2 Laser Cutting Head Preparation

* Adjust the laser head Z-axis so it is positioned around 10 mm above the NVA.
* <mark style="color:orange;">Install the dedicated alignment nozzle (included with the NVA package) onto the laser cutting head.</mark>
* Turn on the cutting head’s red guide light and ensure the red dot fully enters the central.

<figure><img src="https://2847674722-files.gitbook.io/~/files/v0/b/gitbook-x-prod.appspot.com/o/spaces%2FYapTWIOXzXtyiG0euC2d%2Fuploads%2FGIR3d4Gwd5KO4VB3p7Tv%2Fredlight.png?alt=media&#x26;token=14d1eb93-1f16-4002-b1bb-adbbcbd1f216" alt=""><figcaption></figcaption></figure>

{% hint style="danger" %}
\*\*Safety Notice\*\*

&#x20;Keep cutting power disabled at all times; align using the red guide light only. Follow site laser-safety procedures.
{% endhint %}
{% endstep %}

{% step %}

### 2.3 Connect & Open Web App

> Overview - NVA connects via Wi-Fi. After powering on, it automatically creates a network named NVA-\[Serial Number]. Join this network on your phone to perform alignment.

#### Connect Your Phone

1. Open your phone’s Wi-Fi settings and select the network NVA-\[Serial Number].
2. Tap Join. Password: 88888888 (eight eights).
3. Once connected, open the alignment interface in either of the following ways:

<figure><img src="https://2847674722-files.gitbook.io/~/files/v0/b/gitbook-x-prod.appspot.com/o/spaces%2FYapTWIOXzXtyiG0euC2d%2Fuploads%2F3KlTZKaLQCZsNEkv3QxI%2Fwifi.png?alt=media&#x26;token=d88fdaa6-5c7e-4456-9c87-d9a11c37d19e" alt=""><figcaption></figcaption></figure>

#### *Method 1 — Enter URL*

Open your browser and go to `http://192.168.0.1:8088.`

#### *Method 2 — Enter URL*

Use your browser’s QR code scanner to scan the sticker on the top of the NVA unit and open the link to the alignment page.

<figure><img src="https://2847674722-files.gitbook.io/~/files/v0/b/gitbook-x-prod.appspot.com/o/spaces%2FYapTWIOXzXtyiG0euC2d%2Fuploads%2FojTClHfZpILS1JS01C8o%2Fconnect.png?alt=media&#x26;token=ff62666a-e5ed-431a-8f36-48aa6332338d" alt=""><figcaption></figcaption></figure>
{% endstep %}
{% endstepper %}

## Start Nozzle Align

AUTO MID的区别

{% stepper %}
{% step %}

### Step 1 — Capture Nozzle <mark style="color:$warning;">(Red Guide Light OFF)</mark>

* Open the NVA lens protective cover.
* Turn OFF the red guide light.
* Adjust the nozzle height until the nozzle image is sharp.
* Tap “Step 1: Capture Nozzle (Red OFF)”.
* **Indicator:  When alignment succeeds, a yellow crosshair ring will appear, as shown in following image.**

{% hint style="info" %}
If not shown or unstable: adjust the cutting head position or reposition the NVA until the yellow corsshair ring appear.
{% endhint %}

<figure><img src="https://2847674722-files.gitbook.io/~/files/v0/b/gitbook-x-prod.appspot.com/o/spaces%2FYapTWIOXzXtyiG0euC2d%2Fuploads%2FeMapIDqB9Q0dotsx7JEy%2Fstep1.png?alt=media&#x26;token=870072eb-0062-4f35-8d24-dad132a9e10d" alt=""><figcaption><p>
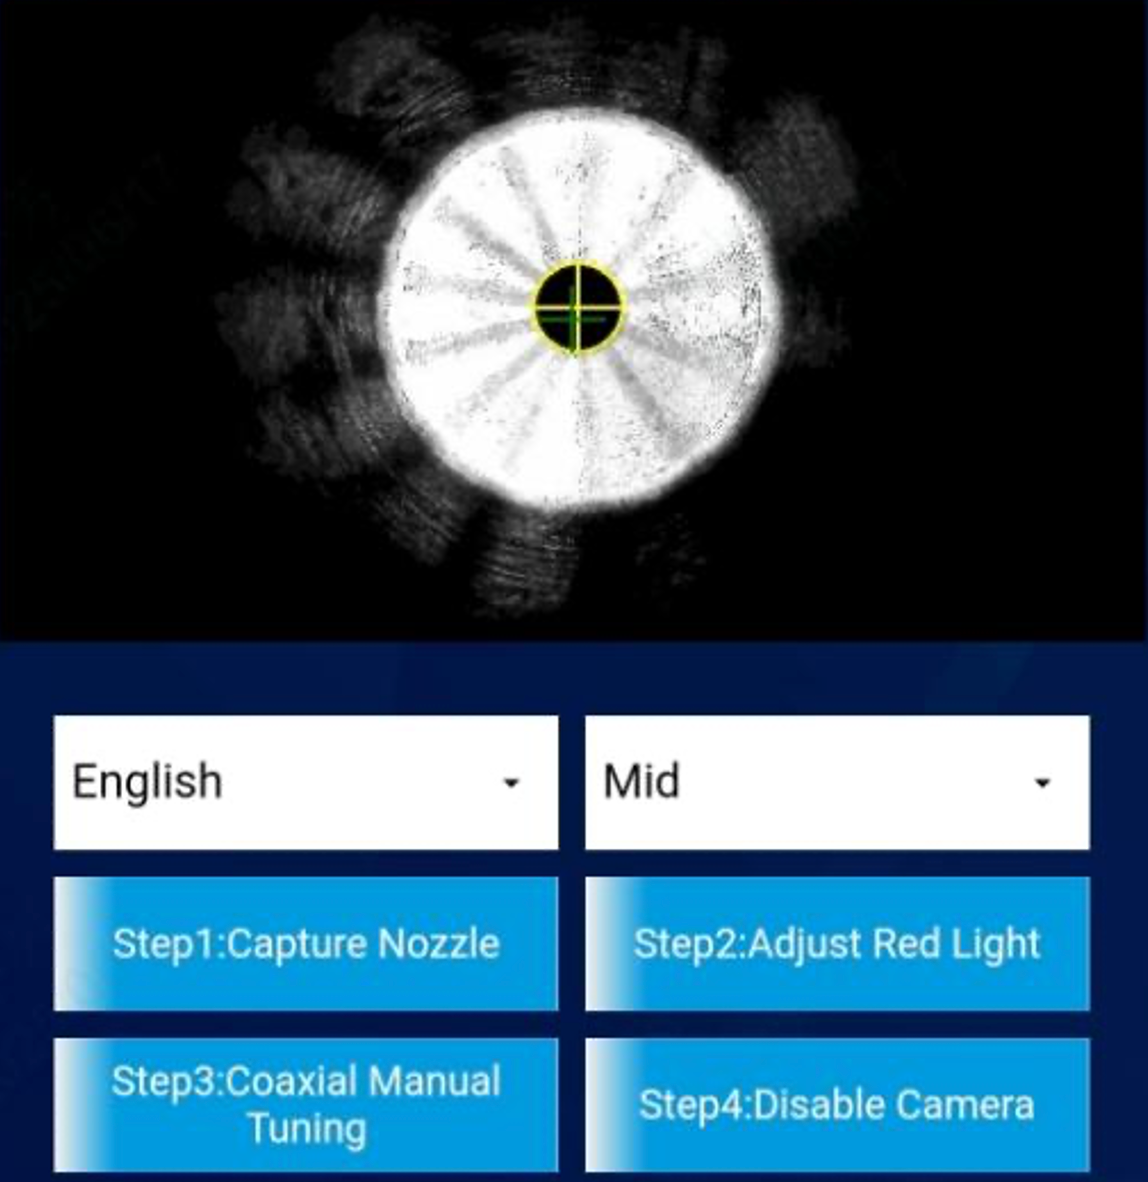
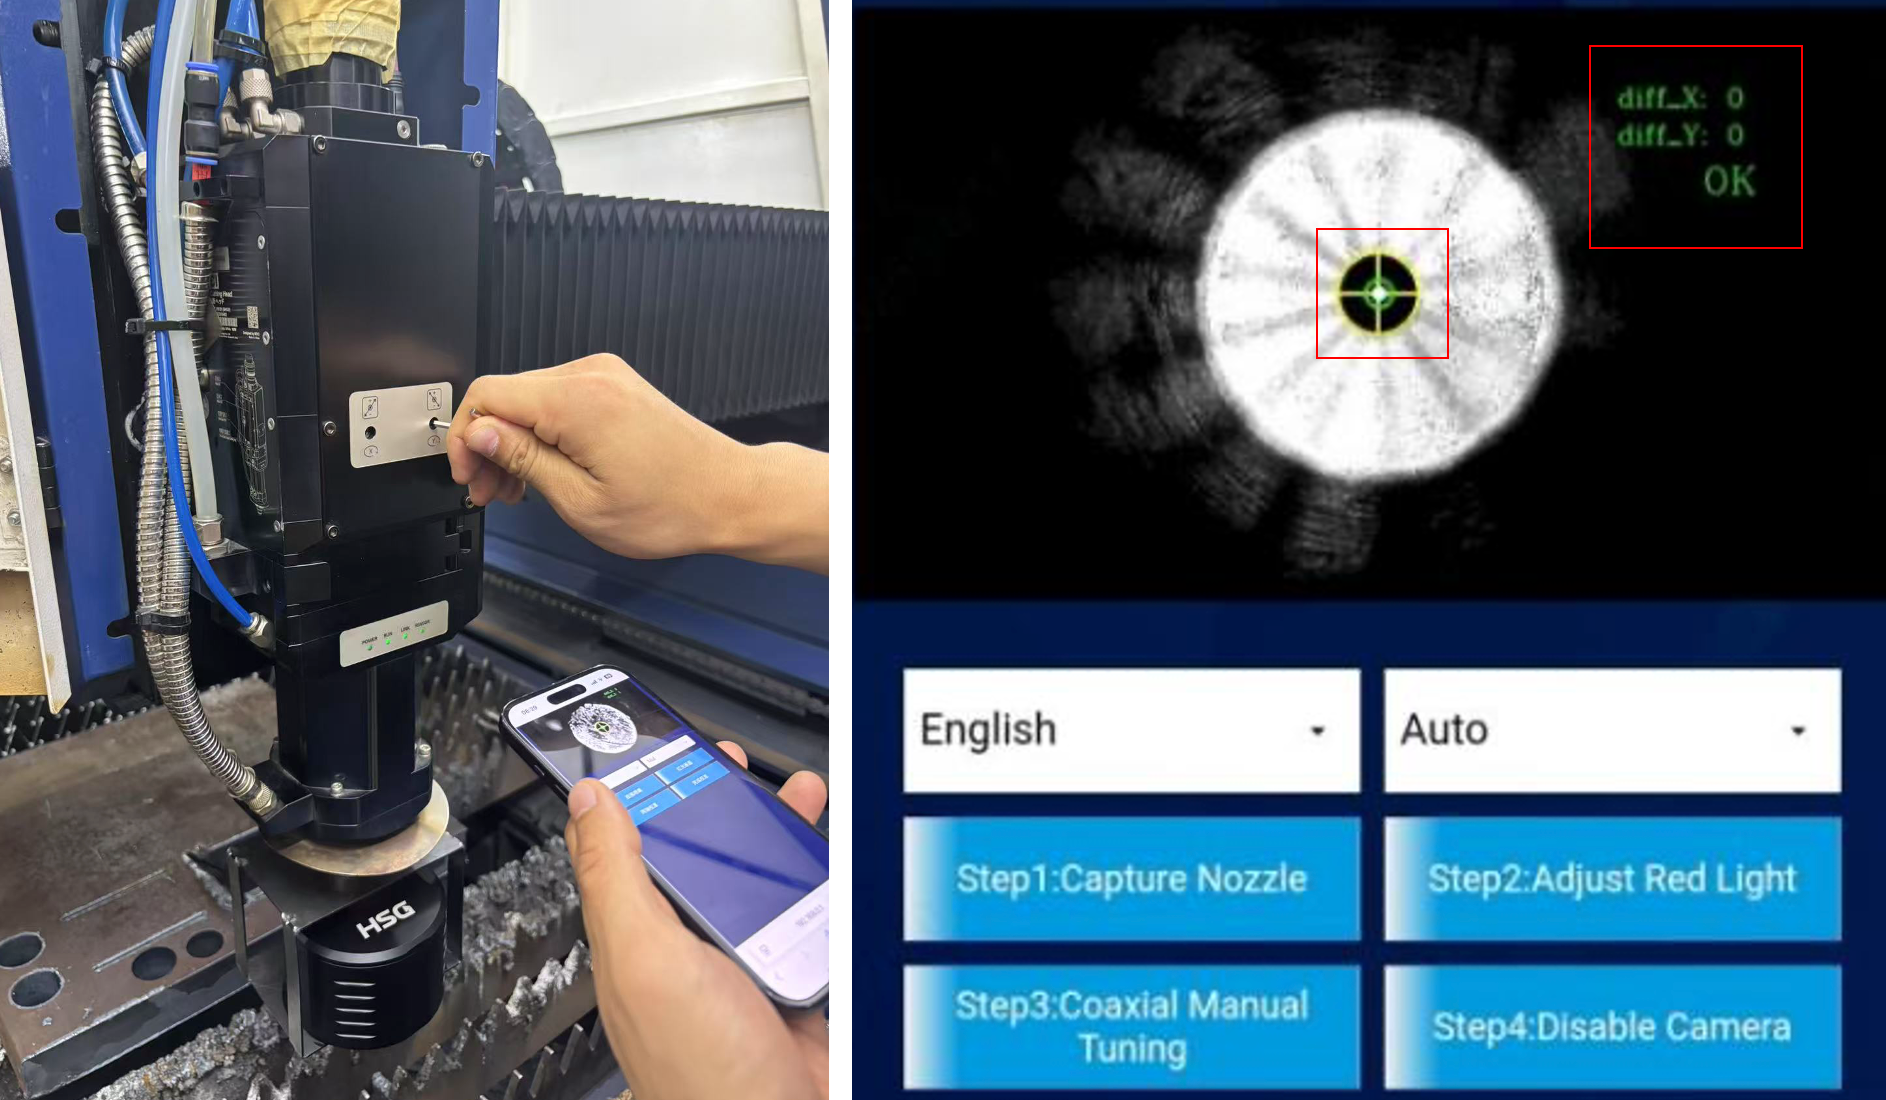
Step 1 completion criterion: The yellow alignment ring—and its center—are perfectly concentric with the nozzle center.</p></figcaption></figure>
{% endstep %}

{% step %}

### Step 2 - Adjust Red-Light Focus (Red Light ON)

* Turn ON the red guide light.
* Tap “Step 2: Adjust Red Light (Red ON)”.
* **Adjust the red-light focus value in the software**—recommended presets -5 mm, -10 mm, -15 mm—**until the spot becomes stable, with concentrated brightness and a sharply defined circular edge**

<figure><img src="https://2847674722-files.gitbook.io/~/files/v0/b/gitbook-x-prod.appspot.com/o/spaces%2FYapTWIOXzXtyiG0euC2d%2Fuploads%2Fva4AI0c4OEvovyo71ciy%2Fredlight%20focus.png?alt=media&#x26;token=8d840517-d976-4061-98ff-165e7f83c295" alt=""><figcaption></figcaption></figure>

{% hint style="info" %}
If the alignment image is unclear, check the NVA lens for dust. If cleaning is needed, use a dedicated laser-head cleaning kit only.
{% endhint %}
{% endstep %}

{% step %}

### Step 3 - Manual Coaxial Alignment

* Tap “Step 3: Coaxial Manual Tuning”.
* Use the coaxial adjustment screws on the cutting head to align.
* Alignment is complete when the red-dot center coincides with the nozzle center (rings/crosshair concentric).  (Auto mode) Coaxial alignment is complete when the diff\_X and diff\_Y indicators in the top-right of the screen both read 0.

<figure><img src="https://2847674722-files.gitbook.io/~/files/v0/b/gitbook-x-prod.appspot.com/o/spaces%2FYapTWIOXzXtyiG0euC2d%2Fuploads%2FH0Roqp7sZJ8rmqR0OgRf%2Fstep3.png?alt=media&#x26;token=1a92f3af-89c0-48dd-bea0-7df4bb0b920d" alt=""><figcaption></figcaption></figure>
{% endstep %}

{% step %}

### Step 4 - Finish

* Remove the NVA device and power it off.
* Remove the dedicated NVA alignment nozzle and reinstall your original nozzle.

{% endstep %}
{% endstepper %}
